The Scene
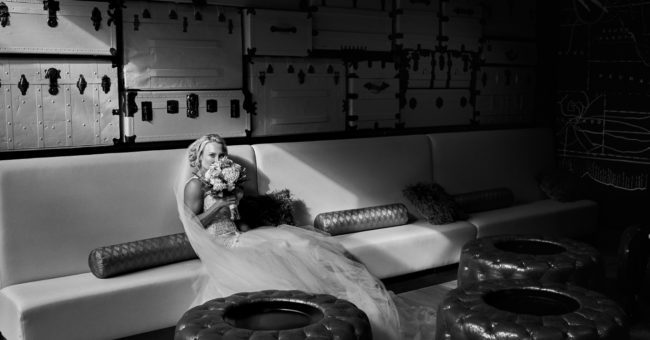
There are three elements that draw me in, inspire, and motivate me to capture an image: emotion, light, and the environment/subject. This location had two of the three, I had to create the third.
I was first drawn to the large white trunks that make up the background of the image, complemented by the modern white booth-style seating, which I noticed as we passed by the hotel lobby on our way out the door to the ceremony. This room caught my eye and was an homage to this historic location and the days gone by. Making a mental note that I would like to get back here later in the day when time permitted, but at that moment I had to respect the other players/vendors and stay on schedule.
This image was taken in the entryway lobby at The Renaissance Minneapolis Hotel AKA, The Depot, a hotel and event space in Minneapolis, Minnesota formally the train depot for the Milwaukee Road Line built in 1899 and remains one of the last long-span, truss-roofed structures surviving in the nation.
The rail line, first built in 1864, was originally known as the Minnesota Central Railroad. In 1867 the Milwaukee and St. Paul Railroad bought the Minnesota Central Railway, changing the name of the railroad to the Chicago, Milwaukee, and St. Paul Railroad in 1874 before shortening the name to Milwaukee Road.
Creatively Utilizing Natural Light
After a beautiful church ceremony, and some time alone, a cocktail at a favorite restaurant, and a joy ride in a classic Rolls Royce, we returned to the Depot for a celebration with family and friends. On our way back through the doors of the Depot, I saw the sunlight blazing across those aforementioned white trunks, Carpe Diem. It was the perfect time to create a piece of art.
The shaft of sunlight was streaming in the window at a sharp angle, skimming across and partially illuminating the crisp white modern trunks, leaving the rest of them in the shadows. I knew the light was going to be harsh, I had to quickly figure out a way to make this work. First, I placed the bride exactly where I wanted her so the light hit her face. I had the bride turn her back to the light as I didn’t want the bright shaft of sunlight blowing out the white dress. Then turned her head/face into the light, I knew this would also help to create shadows based on the texture of her dress, with the sunlight focused mostly on her face.
I wanted to create some mystery or emotion, so I had her bring the flowers up to her face. I wanted one side of her face lit up; only wanting light on her one eye and a little spillover to slightly illuminate the other. I envisioned a very “Vogue” looking image. I instructed her to look right through me and give me a blank stare. This was one of the many moments throughout the wedding day I took the opportunity to shoot what I wanted or for myself, which I feel is a must for any wedding photographer.
Gear & Settings
The lens I chose for this image was the 24mm f/1.4 G Master, it was wide enough to capture the entire lobby area. In fact, this is a cropped version of the whole image. The groom was seated about ten feet to the right of the bride in the shadows. I did include him in some of the frames but ultimately decided he did not add to this capture. This image was all about the bride.
My settings were 1/2000-sec., f/2, ISO 640 shot on the Sony Alpha 1. With a 50 megapixel file it gives me the ability to crop in closer after the fact, allowing me to create a picture within a picture when the opportunity presents itself, as it did here. I chose a wide f/2.0 aperture as I wanted the focus to fall off, in order to compliment the fall off of the light in the shadows. I could have used a lower ISO and shutter speed, but I mostly shoot in manual and adjust the aperture ring on the lens to control my depth of field. (ISO 640 was the last ISO I used at the previous location inside the restaurant where the couple had drinks. Working fast sometimes I do not take the time to rest ISO for each location)
I handheld the camera as I do with 95% of the imagery on the wedding day, as the day moves fast. We spent maybe 3-5 minutes here because we had to get to the reception for the couple to join their family and friends and to honor a timeline, that isn’t just about photography. I always try to respect my other vendors who also have an obligation to exceed our couple’s expectations as well.
Delivering The Final Image
Black and white was already a given in my mind when I was capturing this image. The light was right, the background was white, and the right side of the image and the foreground were dark, there was never a question in my mind that this image was going to be black & white. I processed the image in Capture One as I do with all my work. I never do too much to my images, slight color corrections, cropping, and black & white conversions, that’s it.
I started my photography career over 30 years ago shooting film, which taught me to get the image right in camera the first time. That now combined with the amazing quality files that come from my Sony cameras and lenses, I don’t need to do much post-work, which allows me to turn around my client’s wedding images in one to two weeks from their wedding day.
I honestly feel I could shoot an entire wedding in JPG and give the files to my clients straight out of the camera. They are that good. However, as a professional and the many benefits of shooting in a RAW file format, there is no reason not to shoot RAW.

